When I was in high school, the way I was taught to make darkroom prints revolved around using test strips. The usual stuff where one uncovers a section of a strip of paper every 3 or 5 seconds giving a set of steps to evaluate how you will make the full print. Back then it was on single grade paper as well. I suspect quite a few learn how to first make prints this way.
And it works well enough, but now that I have been reading Beyond the Zone System; and with the help of some excellent folks on the Large Format Photography forums, I’m starting to discover a better way.
There have been a few AHA moments and the first one was exposing the paper for a fixed amount of seconds doesn’t relate paper exposure in terms of stops because stops are a geometric series, not a linear one. Granted, when I do still make test strips, I still use a fixed number of seconds since my darkroom timer doesn’t support doing test strips by steps, but now I have a much better idea of what’s going on and tend to adjust exposure using the aperture on the enlarger lens a bit more.
Recently, I built on this by doing some paper tests using a step tablet. It is here when things really started to come together.[envira-gallery id="2561"]
The first image is without using any filter, followed by #00 and then #0-5.
These tests were made on Ilford Cooltone resin paper although that doesn’t matter for the scope of this explanation. Paper tests are a very personal thing – you are testing the effect of your entire system from you to the enlarger, enlarger lens, developer, paper used, etc. It’s likely to vary enough to warrant making your own tests for each paper type and developer combination (maybe even enlarger lens) that you have.
As an aside, I plan on adding paper test features to the FilmLog to make tracking and referencing all this easier.
The awesome thing about a step tablet is, at least in the 21-step tablet I have, each step is 1/2 of a stop. This is useful for a number of reasons. First, I now have a really good idea of how each of my multigrade filters (as well as my developer, etc.) impacts the contrast of this paper. I also know how much I need to adjust the exposure when using a particular filter.
Second, I can determine the proper base exposure by looking at the first step that is maximum black and adjusting accordingly for my desired print time and aperture – again depending on which filter I intend to use. The neat thing here is, there is no guessing – I am now in control of those settings. Taking brightness readings during the paper test and before a print is important here as it gives me a somewhat calibrated known quantity. I did this using my phone’s light sensor which worked surprisingly well.
As a practical example, let’s say my filterless test was 21″ at f8. Let’s say the first strip that looks to be completely black is 11 (the scan may deceive you but to my eyes on the real print that’s about right). If I’m printing a real negative, I want maximum black to be at step 1 which is 10 steps, or 5 stops away.
In my case, I can use the 3-stop ND filter I usually use for 4×5 enlargements and can then stop the lens down to f16 and I’m there! Of note here that the height of the enlarger and size of enlargement needs to be the same as the test. In this case, it was a contact print.
What about if the settings aren’t the same? Well, since I measured the lux reading of the baseboard with my phone (with no negative loaded), I just have to dial things in so I get the same reading with the new settings (such as by adjusting the lens aperture). Admittedly I’m glossing over a minor detail – the tests were made using contact printing so when enlarging, one has to consider base fog of the negative among other things. But it’s a start.
To help with that, I can take it a step further, though I haven’t done this part yet, and check each of the lux readings of the steps and recording those values. This means I can then match areas of the enlarged negative with the step tablet to determine how the parts of the negative will be exposed. That’s pretty huge
The other thing I learned, and this was a bit of a hard lesson, is that flare is a real thing!

Notice the difference between this and the other tests? The other tests were contact prints. This was printed through the enlarger lens. You can see how the blacks bleed off their borders and some vignetting (I used a 135mm enlarging lens and could have tamed that with a 150mm perhaps). Flare in practice might not be as bad as the above would indicate – consider that maximum black is at about step 9, so steps 1-8 are effectively overexposed. Nonetheless while I haven’t really had a huge issue with flare for most things, one thing I noticed was with my portraiture. I kept getting a background that seemed much darker than a scan or contact print yet didn’t know why – well, pretty sure this is why!
This is also why it can make sense to do both contact and enlarging print tests since the latter accounts for flare as well as the Callier effect (increasing of contrast due to how silver behaves with diffuse and condensed light) but also can introduce other things such as vignetting.
As far as flare itself, I’m still working through this one. I don’t think there is much I can do here apart from getting another enlarger lens and making sure I account for the backdrop of the portraits I make properly. I found there wasn’t a real way to tame this using multigrade printing either. And while I know it’s a factor, I don’t yet know by how much. But as noted it doesn’t seem to be an issue often – I’ve never noticed it with landscapes and, well really everything except portraits with my dark grey backdrop.
I tend to place my subjects far away from the backdrop for subject isolation and to help blur out wrinkles (as I have a cloth backdrop). I tend to get a deep grey background when scanned or contact printed, but it’s enough to isolate the subject fairly well. That background goes towards black when enlarging, however. Since I like making darkroom portrait prints, this is something I will have to account for in the future. A good way to do that is to use my incident meter against the backdrop and comparing that with the highlight and shadow readings I take of the subject. I can apply the zone system here as well.
It honestly took me a while to realize the benefits of all this. Beyond the Zone System is a heavy read and it didn’t translate directly for me until I just gave it a go. I still have a lot to learn and do, but this method I can see as being highly valuable for saving time and paper. This will be especially valuable when I start doing fiber based prints, which seem to significantly slow down the process due to the extended wash times and the need to evaluate exposures when the paper is dry.
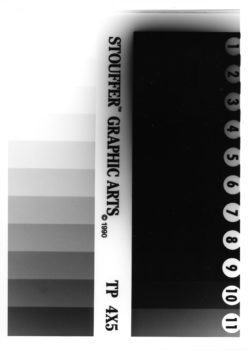
Of note I bought my tablet direct from Stouffer. I decided on the TP45x21C (though generally you don’t need a calibrated one). This is basically the same thing as the normal 21-step tablet just in a convenient layout for both contact printing and enlarging since I have an enlarger that can do 4×5. Either way, I’m super sold on these now – it will easily pay for itself in the time and paper it will save while giving me valuable insight into how various papers and developers are affected by the contrast filters.
One final note, this is fairly new to me so I may not be explaining it quite well. But the end-game as it were is I can evaluate how a print will look without having to make as many test strips. And that’s huge! Granted if I need to do dodging and burning or split-grade, this helps a bit less, but still will help me nail the base exposure as a good starting place. That means I can spend more time in the darkroom working on the creative process and that’s fantastic!