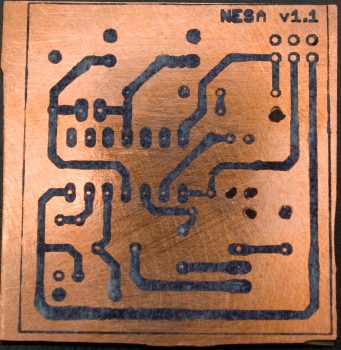
I have two New Year’s resolutions – 1. to study the Constitution and 2. to finish my MidiBox SID Rackmount, which I have dubbed the MB-SIDR8TR. In order to finish it by years end, I have decided to try my hand at etching my own PCBs. A couple of people from XCSSA (a local group of hardware / exotic computing enthusiasts) were very helpful and so I thought I would share one of my creations. Meet NESA 1.1:

Where is NES 1.0? Well, I have it drilled and populated with some parts but I realized it would be good practice to do it again. I mis-measured the size of the capacitors used and the board came out a bit smeared. NESA actually has little to do with the MB-SIDR8TR. It has a lot more to do with Victim Cache, a band John and I formed recently. It was, however, good practice for making some of the larger boards required for the MB-SIDR8TR. NESA actually borrows from the CMOY Pocket Amplifier. I needed a way to reduce noise from the NES when recording it for Victim Cache while also protecting the 2A03 itself. Enter NESA. It’s basically very similar to the CMOY but with a 4-channel Op-Amp since I needed 3 channels (two from the 2A03 itself and 1 from Cartridge In). It totally bypasses the NES on-board audio. The helpful peeps at the NESdev helped me out quite a bit there too.
Unfortunately for etching, it’s a bit cold to do much (hence why I spent time taking photos of the board instead of getting down to business etching it) but hopefully I can do that, along with the MB-SIDR8TR power board, later this week. I have to admit, though care must be taken when dealing with acids capable of etching metals (obviously), it was not near as bad as I thought it would be and turned out to be pretty fun! The most challenging aspect seems to be drilling. I have a Dremmel drill press, tiny bits, the works. It just takes time and patience to align things. We’re talking about widths of 1mm (sometimes less) here, after all.
Granted, setting up the Cupric Chloride has taken some trial and error. When I made NESA 1.0, I used a starter etchant (1 part Muratic Acid and 2 parts Hydrogen Peroxide) and that did a very good job quickly. The next time around, however, I ended up with oxidation more than etching. This was my first stab at etching the power board. I think I need more O2 so next time I may add some more peroxide, though I also have an airpump running to help aerate the acid. I also did that because I wasn’t sure how the freezing temperatures here might affect things. Pretty excited to take another stab at it, however.
I’m even more excited to see NESA in action. Hopefully I don’t blow anything (particularly the 2A03) up. After that, it’s down to business designing and etching the various boards required for the MB-SIDR8TR. There’s about 6 boards for the control surface, plus the 1 power board. The boards themselves, I think, will be pretty simple. I have not been able to easily make a single-sided board, however. Double-sided boards require a lot more care to etch of course.
I plan on sharing my work of course. Should anyone want the NESA board designs now, though untested, I can provide them. The MB-SIDR8TR is coming togrether. You can find more details in the MidiBox wiki (which is unfortunately down right now. If anyone wants to learn how to etch boards using Cupric Chloride, I found this site very helpful. Oh, and by the way, the beard is gone. I have been more excited about etching boards than taking a photo of my lack of beard. After having tried it both ways, I much prefer to be clean shaven…